How to Use Keurig Mini? Good Tips and Guides in 2024
HOW TO USE KEURIG MINI? GOOD TIPS AND GUIDES IN 2024.
In a fast-paced world where time is a precious commodity, convenience and efficiency in our daily routines have become paramount. For coffee lovers, the quest for that perfect cup of joe often demands a quick and hassle-free brewing experience. Enter the Keurig Mini – a compact and user-friendly single-serve coffee maker that has taken the art of brewing to new heights.
The Keurig Mini, a part of the renowned Keurig coffee maker family, stands out as a versatile and space-saving solution that satisfies your coffee cravings in minutes. Designed with simplicity in mind, it caters to both seasoned coffee enthusiasts and those just starting their journey into the world of coffee.
Whether you’re a busy professional, a college student, or simply someone who cherishes a delightful cup of coffee, the Keurig Mini promises to be your faithful companion. In this comprehensive guide, we’ll walk you through the step-by-step process of using the Keurig Mini, from setup to brewing, to help you savor the delightful aroma and rich flavors of your favorite beverages with ease.
Join us as we explore the art of brewing with the Keurig Mini, uncovering its unique features, sharing valuable tips, and ensuring you get the most out of this incredible coffee maker. So, grab your favorite coffee blend, settle into a comfortable spot, and get ready to indulge in the joy of hassle-free brewing with your Keurig Mini.
Let’s embark on this delightful coffee adventure together!

HOW TO USE KEURIG MINI?
1. WHAT IS A KEURIG MINI?
As of my last knowledge update in September 2021, the Keurig Mini refers to the Keurig K-Mini series, a line of compact and single-serve coffee makers produced by Keurig, a popular brand known for its innovative brewing systems. The Keurig Mini is designed for individuals or households looking for a quick and convenient way to brew a single cup of coffee, tea, hot chocolate, or other hot beverages.
The Keurig Mini machines are known for their small footprint, making them ideal for small kitchens, dorm rooms, offices, or anyone with limited counter space. Despite their compact size, they offer a wide range of features and functionalities similar to their larger Keurig counterparts.
Here are some key features commonly found in the Keurig Mini series:
- Single-Serve Brewing: The Keurig Mini uses specialized coffee pods known as K-Cups, which contain pre-measured coffee grounds, teas, or other beverages. Each K-Cup is designed to brew a single cup of your chosen drink, ensuring minimal waste and consistent quality.
- One-Touch Operation: Brewing with the Keurig Mini is remarkably simple. Users only need to add water to the reservoir, insert the desired K-Cup, select the cup size, and press a button to start the brewing process.
- Removable Drip Tray: The drip tray can be adjusted or removed to accommodate different cup sizes, allowing you to use various mug or cup sizes for your beverages.
- Auto-Off Feature: Many Keurig Mini models come equipped with an auto-off feature, which helps conserve energy by automatically powering off the machine after a period of inactivity.
- Maintenance and Care: Keurig Mini machines are designed to be easy to clean and maintain. Regular descaling and cleaning are essential to keep the coffee maker in optimal condition.
Please note that Keurig may have released new models or updated the Keurig Mini series after my last update, so it’s always a good idea to check the latest information and features on the Keurig website or through other reliable sources.
You can see How to Use Keurig Mini as below.
2. HOW MANY TYPES OF KEURIG MINI?
Keurig offered several models in the Keurig Mini series, each with its own unique features and variations. It’s important to note that Keurig may have introduced new models or updated the Keurig Mini series since then. To get the most current and comprehensive list of Keurig Mini models, I recommend visiting the official Keurig website or checking with authorized Keurig retailers.
As of my last update, here are some of the popular Keurig Mini models:
- Keurig K-Mini: The original Keurig K-Mini is a basic and compact single-serve coffee maker with a removable drip tray, auto-off feature, and the ability to brew cup sizes between 6 to 12 ounces.
- Keurig K-Mini Plus: This model is an upgraded version of the K-Mini, offering additional features such as a strong brew option for a more intense cup of coffee and the ability to brew any cup size between 6 to 12 ounces. It also has a removable water reservoir for easy refilling.
- Keurig K-Mini Basic: This is a simplified version of the K-Mini with fewer features, but it still offers the convenience of single-serve brewing in a compact design.
- Keurig K-Mini Plus Single Serve Coffee Maker Bundle: This bundle includes the K-Mini Plus machine along with a 12-count variety pack of K-Cup pods to get you started.
- Keurig K-Mini Plus Special Edition: Similar to the K-Mini Plus, this model comes with added perks like a sleek matte finish and premium nickel-colored accents.
Remember that Keurig may have expanded the Keurig Mini series with new models or made updates to the existing ones, so be sure to check the latest offerings from Keurig to see the complete lineup.
You can refer How to Use Keurig Mini as below.
3. WHAT ARE BENEFITS OF KEURIG MINI?
The Keurig Mini, or Keurig K-Mini series, offers several benefits that make it a popular choice for coffee enthusiasts and those seeking a quick and convenient way to brew single servings of coffee and other hot beverages. Some of the key benefits of the Keurig Mini include:
- Compact and Space-Saving: The Keurig Mini is designed to be compact and take up minimal counter space. Its small footprint makes it ideal for small kitchens, dorm rooms, apartments, offices, and other spaces with limited room.
- Quick and Easy Brewing: With the Keurig Mini, brewing a cup of coffee or hot beverage is as easy as inserting a K-Cup, adding water to the reservoir, and pressing a button. The brewing process is quick, typically taking just a minute or two to prepare a hot drink.
- Single-Serve Convenience: The Keurig Mini uses single-serve K-Cup pods, which are pre-measured with coffee grounds, tea, hot chocolate, and other beverages. This eliminates the need for measuring coffee grounds or dealing with messy filters, providing a hassle-free brewing experience.
- Variety of Beverage Choices: Keurig offers a wide selection of K-Cup flavors and brands, giving users the ability to choose from various coffee blends, teas, hot chocolates, and specialty beverages. This versatility allows users to enjoy a wide range of flavors without the need to buy large quantities of different beans or teas.
- Consistent Brewing Quality: The Keurig Mini is engineered to deliver consistent brewing results for each cup, ensuring that you get the same great taste every time you brew your favorite beverage.
- Energy Efficiency: Many Keurig Mini models come with an auto-off feature, which automatically powers off the machine after a period of inactivity. This helps conserve energy and reduces electricity consumption.
- Easy Maintenance: The Keurig Mini is designed for easy cleaning and maintenance. Regular descaling and cleaning routines help keep the machine in optimal condition, ensuring its longevity and continued performance.
- Portable and Travel-Friendly: Due to its compact size, the Keurig Mini is portable and easy to transport. It’s a great option for individuals who frequently travel or want to take their coffee maker on-the-go.
- No Waste: Since the Keurig Mini brews a single cup at a time, there’s little to no wasted coffee or beverages, making it an environmentally-friendly choice for those concerned about sustainability.
Overall, the Keurig Mini provides a convenient, efficient, and versatile brewing solution, catering to the needs of coffee lovers and hot beverage enthusiasts alike.
Please see How to Use Keurig Mini as below.
4. WHAT SHOULD WE CONSIDER BEFORE BUYING KEURIG MINI?
Before purchasing a Keurig Mini or any coffee maker, there are several important factors to consider ensuring that it meets your specific needs and preferences. Here are some key considerations before buying a Keurig Mini:
- Brew Size Options: Different Keurig Mini models offer various brew size options, typically ranging from 6 to 12 ounces. Consider your preferred cup size and the flexibility to adjust the brew size to match your daily coffee consumption.
- Pod Compatibility: Ensure that the Keurig Mini model you choose is compatible with the type of K-Cup pods you prefer. Keurig offers a wide variety of K-Cup flavors and brands, but some older models may have limitations on pod compatibility.
- Water Reservoir Size: Keurig Mini models have different water reservoir capacities. If you plan to brew multiple cups of coffee in quick succession without refilling the reservoir each time, opt for a model with a larger water tank.
- Space and Portability: The main advantage of the Keurig Mini is its compact size. Consider the available counter space in your kitchen or the portability if you plan to move it frequently or take it on trips.
- Energy Efficiency: Look for a Keurig Mini model with an auto-off feature that automatically powers off the machine after a period of inactivity. This helps save energy and reduces electricity consumption.
- Brewing Time: While Keurig Minis are generally quick, brewing times can vary slightly between models. If you value a faster brewing process, check for models with a shorter brewing time.
- Maintenance and Cleaning: Consider the ease of cleaning and maintenance. Models with removable drip trays and water reservoirs are usually easier to clean and maintain.
- Durability and Warranty: Look for a model with good build quality and durability to ensure it lasts over time. Additionally, check the warranty period to provide coverage in case of any manufacturing defects.
- Price and Budget: Keurig Minis come at various price points. Determine your budget and choose a model that offers the features you need within your price range.
- Reviews and Ratings: Before making a final decision, read customer reviews and check ratings for the specific Keurig Mini model you’re interested in. This will give you insights into real-world experiences and potential issues with the product.
- Brand Reputation: Consider the reputation of the Keurig brand in general. Keurig is well-known for its coffee makers, and a reputable brand often indicates higher quality products and better customer support.
By considering these factors, you can make an informed decision and choose the Keurig Mini model that best aligns with your preferences, lifestyle, and brewing needs.
Please refer How to Use Keurig Mini as below.
5. STEPS ON HOW TO USE KEURIG MINI.
Using a Keurig Mini is a straightforward process. Here are the general steps to follow:
Note: The exact steps may vary slightly depending on the specific model of the Keurig Mini you have. Always refer to the user manual that comes with your machine for model-specific instructions.
Step 1: Prepare the Machine.
- Place the Keurig Mini on a flat and sturdy surface near an electrical outlet.
- Lift the water reservoir lid located at the top of the machine and remove the water reservoir. Wash the reservoir with soap and water before using it for the first time. Fill the reservoir with fresh, cold water to the desired level based on your desired cup size (usually indicated inside the reservoir or on the side).
Step 2: Preheat the Keurig Mini.
- Plug in the machine and switch it on using the power button (if applicable).
- The Keurig Mini may take a few minutes to preheat. During this time, the power indicator light will illuminate, indicating that the machine is warming up.
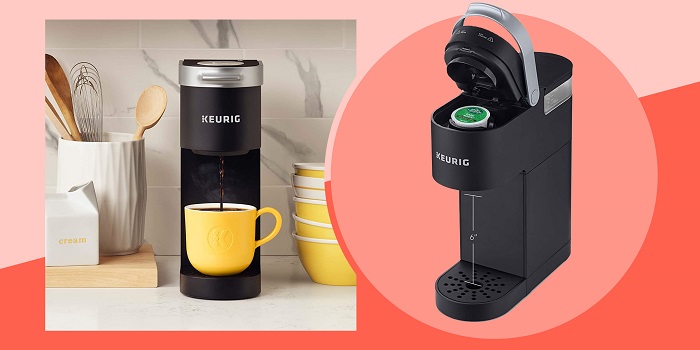
Step 3: Insert the K-Cup.
- Lift the handle on the front of the Keurig Mini to open the brewing chamber.
- Insert a K-Cup pod into the holder with the foil top facing up. Ensure the pod is placed securely in the chamber.
Step 4: Select Brew Size.
- The Keurig Mini usually has buttons or controls for selecting the brew size. Choose your desired cup size (e.g., 6 ounces, 8 ounces, 10 ounces) based on the water level you filled in the reservoir.
Step 5: Brew Your Beverage.
- Close the brewing chamber by lowering the handle until it clicks into place.
- Place a mug or cup on the drip tray under the brew spout.
- The machine will start the brewing process once you select the brew size. The water from the reservoir will pass through the K-Cup and into your mug, brewing your chosen beverage.
Step 6: Enjoy Your Beverage.
- Once the brewing process is complete, the machine will stop automatically. Lift the handle to remove the used K-Cup and dispose of it properly.
- Stir your drink, add any additional ingredients (e.g., milk, sugar), and enjoy your freshly brewed beverage!
Step 7: Turn Off and Clean Up.
- Turn off the Keurig Mini by using the power button (if applicable) or simply unplugging it from the electrical outlet.
- If the drip tray is removable, take it out and empty any collected liquid. Wash the drip tray and the water reservoir regularly to keep the machine clean and hygienic.
And that’s it! Following these steps will help you make a delicious cup of coffee or your favorite hot beverage with your Keurig Mini. Remember to refer to the user manual for your specific model for any model-specific instructions or troubleshooting tips.
There are How to Use Keurig Mini as above.
6. HOW TO CLEAN KEURIG MINI?
Cleaning your Keurig Mini is essential to maintain its performance and ensure that your beverages taste fresh and delicious. Here’s a step-by-step guide on how to clean your Keurig Mini:
Note: Before cleaning your Keurig Mini, always unplug it from the electrical outlet and allow it to cool down.
Regular Cleaning (Daily/Weekly):
- Clean the Exterior: Wipe the exterior of the Keurig Mini with a damp, soft cloth to remove any dust or spills. Avoid using abrasive cleaners that might scratch the surface.
- Clean the Drip Tray: If your Keurig Mini has a removable drip tray, take it out and wash it with warm soapy water. Rinse and dry it thoroughly before placing it back in the machine.
- Empty the Water Reservoir: Discard any remaining water in the water reservoir and remove any used K-Cups from the brewing chamber.
- Clean the Water Reservoir: Wash the water reservoir with warm soapy water, rinse it thoroughly, and allow it to air dry.
- Clean the Brewer Needle: The needle that punctures the K-Cup can become clogged with coffee grounds or debris. Gently clean it using a paperclip or a Keurig-approved cleaning tool. Be careful not to damage the needle.
Descaling (Every 3-6 Months or as Needed):
Descaling is a process that removes mineral deposits (scale) from the internal components of the Keurig Mini, ensuring it functions properly and maintains the best taste.
- Prepare the Machine: Empty the water reservoir and remove any used K-Cups from the brewing chamber.
- Prepare the Descaling Solution: Purchase a Keurig-approved descaling solution or make a homemade solution by mixing equal parts of white vinegar and water.
- Add the Descaling Solution: Pour the descaling solution into the water reservoir, filling it up to the MAX fill line.
- Start the Descaling Cycle: Place a large mug or cup under the brew spout. Turn on the machine and start a brew cycle without inserting a K-Cup. Run the brew cycle until the reservoir is empty and the descaling solution has passed through the machine.
- Rinse the System: Refill the water reservoir with clean, fresh water. Run multiple brew cycles without a K-Cup to rinse the machine thoroughly and remove any remaining descaling solution.
- Clean the Exterior: Wipe the exterior of the Keurig Mini with a damp cloth to remove any residue from the descaling process.
- Descaling Reminder Reset (if applicable): Some Keurig Mini models have a descaling reminder feature. If you’ve completed the descaling process, follow the manufacturer’s instructions to reset the descaling reminder.
Following these cleaning steps will help keep your Keurig Mini in good working condition and ensure the quality of your brewed beverages. Refer to your Keurig Mini’s user manual for any specific cleaning instructions related to your model.
Above is information about How to Use Keurig Mini. Now, let’s see some tips and guides on How to Use Keurig Mini as below.
TIPS AND GUIDES ON HOW TO USE KEURIG MINI.

1. SOME TIPS ON HOW TO USE KEURIG MINI.
Here are some useful tips to enhance your experience and get the most out of your Keurig Mini:
- Use Fresh Water: Always use fresh, cold water in the water reservoir. Avoid using hot water from the tap, as it may not produce the best-tasting coffee.
- Preheat the Machine: Allow your Keurig Mini a few minutes to preheat before brewing. This ensures that your beverage will be brewed at the optimal temperature.
- Clean the Needle Regularly: To prevent clogs and ensure proper water flow, clean the brewer needle regularly using a paperclip or a Keurig-approved cleaning tool.
- Choose the Right K-Cup: Keurig offers a wide variety of K-Cup flavors and brands. Experiment with different blends to find your favorites.
- Adjust Brew Strength: Some Keurig Mini models have a “Strong Brew” option that increases the brew’s strength. If you prefer a bolder cup of coffee, try using this feature.
- Use the Right Cup Size: Choose the appropriate cup size for your beverage. Using a cup that is too large may result in weak coffee, while a cup that is too small could lead to overflow.
- Clean the Drip Tray Regularly: If your Keurig Mini has a removable drip tray, clean it regularly to prevent spills and keep your brewing area tidy.
- Descaling Maintenance: Descaling your Keurig Mini every 3 to 6 months (or as needed) is essential to remove mineral deposits and ensure optimal performance.
- Check for Compatibility: Some Keurig Mini models may have specific pod compatibility requirements. Double-check which K-Cups are compatible with your machine to avoid any issues.
- Try Different Beverages: Don’t limit yourself to just coffee. The Keurig Mini can also brew tea, hot chocolate, cider, and more. Explore the variety of options available for a delightful experience.
- Use the Correct Position: Ensure the handle of the brewing chamber is fully closed before starting the brewing process. A properly closed handle will engage the mechanism and initiate the brewing cycle.
- Prime the Machine (If Needed): If your Keurig Mini hasn’t been used for an extended period, it might need priming. Run a few cycles with just water to remove any air bubbles and ensure smooth operation.
- Save Energy: To conserve energy, turn off the Keurig Mini when not in use, or look for models with an auto-off feature that powers down the machine after a period of inactivity.
By following these tips, you can make the most of your Keurig Mini and enjoy a seamless and delightful brewing experience with each cup of your favorite beverage.
We introduce How to Use Keurig Mini as above.
2. HOW TO MAINTAIN KEURIG MINI?
Maintaining your Keurig Mini is essential to ensure its longevity and optimal performance. Regular maintenance helps keep your coffee maker clean, free from clogs, and functioning efficiently. Here are some maintenance tips to keep your Keurig Mini in excellent condition:
- Regular Cleaning:
- Clean the exterior of the Keurig Mini with a damp cloth to remove dust and spills.
- Wash the drip tray and the water reservoir with warm soapy water regularly to prevent buildup of coffee residue or minerals.
- Clean the Brewer Needle:
- The needle that punctures the K-Cup can get clogged with coffee grounds or debris. Gently clean it using a paperclip or a Keurig-approved cleaning tool. Be careful not to damage the needle.
- Descale the Machine:
- Descaling is necessary to remove mineral deposits (scale) that can accumulate over time. Follow the descaling instructions in the user manual or the descaling solution’s packaging. Perform descaling every 3 to 6 months or as needed.
- Replace Water Filters (if applicable):
- If your Keurig Mini has a built-in water filter, replace it periodically according to the manufacturer’s recommendations. This helps maintain the water’s quality and prevents impurities from affecting the taste of your beverages.
- Use Fresh Water:
- Always use fresh, cold water in the water reservoir. Avoid using hot water from the tap, as it may not produce the best-tasting coffee.
- Store K-Cups Properly:
- Store K-Cups in a cool, dry place away from direct sunlight. This helps preserve their freshness and ensures the best flavor when brewing.
- Check for Leaks:
- Regularly inspect your Keurig Mini for any signs of leaks. If you notice any water or coffee spills, address the issue promptly to prevent damage to the machine.
- Empty the Water Reservoir and Drip Tray:
- When not in use for an extended period or before transporting the machine, empty the water reservoir and drip tray to prevent water spillage or damage during movement.
- Store Properly During Non-Use:
- If you plan to store the Keurig Mini for an extended period, ensure it is clean and completely dry before storing it in a safe and dry location.
- Refer to the User Manual:
- Always consult the user manual that comes with your Keurig Mini for specific maintenance instructions and troubleshooting tips relevant to your model.
By following these maintenance practices, you can ensure that your Keurig Mini operates smoothly and consistently, providing you with delicious beverages for years to come. Regular maintenance will also help prevent issues and prolong the life of your coffee maker.
You can see How to Use Keurig Mini as above.
3. HOW TO BUY KEURIG MINI?
To buy a Keurig Mini, follow these steps to ensure a smooth and successful purchase:
- Research and Compare Models: Start by researching the different Keurig Mini models available. Visit the official Keurig website and check out various online retailers to compare features, specifications, and prices. Consider factors such as cup size options, water reservoir capacity, available colors, and any additional features you may want.
- Set a Budget: Determine your budget for the Keurig Mini. Prices can vary depending on the model and any included accessories or bundles.
- Read Reviews: Look for customer reviews and ratings for the specific Keurig Mini models you are interested in. These reviews can provide valuable insights into the performance and user experience with the product.
- Check Retailers: Browse through online retailers, department stores, or specialty stores that carry Keurig products. Popular online retailers include Amazon, Walmart, Best Buy, and the official Keurig website.
- Look for Deals and Discounts: Keep an eye out for any ongoing promotions, discounts, or special offers on Keurig Minis. Some retailers may offer bundle deals with extra K-Cup pods or other accessories.
- Verify Product Information: Double-check the product information and specifications to ensure you are getting the exact model and color you want. Look for any warranty details and return policies.
- Check Availability: Confirm that the Keurig Mini model you want is available and in stock. Some popular models may have high demand and could be temporarily out of stock.
- Check Shipping Options: If you are purchasing online, review the shipping options and estimated delivery times. Some retailers may offer free shipping or expedited shipping for an additional fee.
- Check Return Policy: Before finalizing your purchase, review the retailer’s return policy to ensure that you can return or exchange the Keurig Mini if needed.
- Place Your Order: Once you have selected the Keurig Mini model you want and have completed all necessary checks, add the product to your cart and proceed to checkout. Enter your shipping and payment information to complete the purchase.
- Consider Accessories: Depending on your preferences, you may also want to consider purchasing additional accessories, such as a variety pack of K-Cup pods or a reusable K-Cup filter for more brewing options.
- Track Your Order: If you purchased online, track the shipping progress of your order to anticipate its arrival.
By following these steps, you can confidently purchase the Keurig Mini that best suits your needs and enjoy the convenience of single-serve brewing at home or wherever you choose to use your Keurig Mini.
You can refer How to Use Keurig Mini as above.
4. TROUBLE SHOOTING ABOUT KEURIG MINI.
If you encounter any issues with your Keurig Mini, don’t worry! Many common problems can be resolved with simple troubleshooting steps. Here are some common troubleshooting tips for Keurig Mini:
- Coffee Not Brewing or Slow Brewing:
- Check if there’s enough water in the water reservoir and if it’s properly positioned.
- Verify that the brewer needle is clean and not clogged. Clean it with a paperclip or a Keurig-approved cleaning tool if necessary.
- Ensure the K-Cup is correctly inserted into the brewing chamber, and the handle is fully closed.
- If using a reusable K-Cup, make sure it is filled with the correct amount of coffee grounds and not packed too tightly.
- Machine Not Turning On:
- Check if the Keurig Mini is properly plugged into a working electrical outlet.
- Verify that the power button is pressed (if applicable) and that the machine is turned on.
- Ensure the outlet has power by plugging another device into it.
- Coffee Tastes Bad or Off-Flavor:
- Descale the Keurig Mini to remove mineral deposits that may affect the taste. Follow the descaling instructions in the user manual or on the descaling solution packaging.
- Use fresh, cold water in the water reservoir for brewing.
- Clean the brewer needle regularly to prevent buildup that can affect taste.
- Leaking or Dripping Water:
- Check if the water reservoir is filled to the appropriate level and properly seated.
- Inspect the K-Cup for any damage or punctures that may cause leaking.
- Clean the exit needle and ensure it is not clogged.
- Machine Not Dispensing the Selected Brew Size:
- Verify that the correct brew size button is selected and the appropriate cup size is placed under the brew spout.
- Check if the water reservoir is filled with enough water to dispense the selected brew size.
- Loud or Unusual Noises:
- Some noise during the brewing process is normal, but if you notice loud or unusual noises, make sure the machine is on a stable surface.
- Check for any foreign objects stuck in the machine that may be causing the noise.
- Touch Controls Not Responding (for models with touch controls):
- Make sure the control panel is clean and free from any debris or moisture that may interfere with the touch sensitivity.
- “Add Water” Error Message:
- Even if there appears to be water in the reservoir, remove it and re-seat it properly to ensure a proper connection.
If troubleshooting doesn’t resolve the issue, consult the Keurig Mini’s user manual for more specific troubleshooting steps and contact Keurig customer support for further assistance. Remember to always unplug the machine before attempting any troubleshooting or maintenance.
Please see How to Use Keurig Mini as above.
5. SOME COFFEE RECIPES FOR KEURIG MINI.
While the Keurig Mini is primarily designed for single-serve brewing, you can still get creative and make various coffee recipes using K-Cup pods as a base. Here are some delicious coffee recipes you can try with your Keurig Mini:
- Iced Coffee:
- Brew your favorite coffee K-Cup on the smallest cup size setting directly into a cup filled with ice.
- Add sweeteners or creamers to taste.
- Top it off with whipped cream and a drizzle of chocolate or caramel syrup for an indulgent treat.
- Mocha Latte:
- Brew a dark roast coffee K-Cup on the smallest cup size setting.
- Stir in 1-2 tablespoons of hot cocoa mix until fully dissolved.
- Add milk or cream to taste and top with whipped cream and a sprinkle of cocoa powder.
- Vanilla Latte:
- Brew a medium roast coffee K-Cup on the smallest cup size setting.
- Stir in 1-2 tablespoons of vanilla syrup.
- Froth milk separately and pour it over the coffee to create a creamy latte. Top with a sprinkle of cinnamon or nutmeg.
- Caramel Macchiato:
- Brew a medium roast coffee K-Cup on the smallest cup size setting.
- Stir in 1-2 tablespoons of caramel syrup.
- Froth milk separately and gently pour it over the coffee to create a layered look. Drizzle additional caramel syrup on top.
- Coconut Almond Coffee:
- Brew a flavored coconut coffee K-Cup on the smallest cup size setting.
- Add a splash of almond milk and a dash of almond extract.
- Top with whipped cream and toasted coconut flakes.
- Spiced Pumpkin Coffee:
- Brew a pumpkin spice coffee K-Cup on the smallest cup size setting.
- Stir in 1-2 tablespoons of pumpkin puree and a pinch of pumpkin pie spice.
- Add milk or cream to taste and top with whipped cream and a sprinkle of cinnamon.
- Iced Caramel Macchiato:
- Brew a medium roast coffee K-Cup on the smallest cup size setting directly into a cup filled with ice.
- Add milk and caramel syrup to taste.
- Drizzle additional caramel syrup on top and stir gently.
Feel free to adjust the ingredients and measurements based on your taste preferences. These recipes are just a starting point, and you can get creative with different flavors and combinations using your Keurig Mini and a variety of K-Cup options available. Enjoy experimenting with new coffee creations!
Please refer How to Use Keurig Mini as above.
6. COMMON MISTAKES ON HOW TO USE KEURIG MINI.
Using a Keurig Mini is generally straightforward, but some common mistakes can occur if users overlook certain steps or features. Here are some common mistakes people might make when using the Keurig Mini:
- Not Adding Enough Water: Forgetting to fill the water reservoir to the appropriate level can lead to incomplete brewing or even an “Add Water” error message.
- Using Hot Water from the Tap: Using hot water from the tap can affect the taste of your coffee. Always use fresh, cold water for the best results.
- Not Cleaning the Brewer Needle: Neglecting to clean the brewer needle can result in clogs, slow brewing, or uneven flow of water through the K-Cup.
- Improperly Seating the Water Reservoir: If the water reservoir is not seated properly in its place, the Keurig Mini may not brew correctly or may display an error message.
- Using the Wrong Brew Size: Selecting the wrong brew size can lead to either weak or overly strong coffee, depending on the amount of water used.
- Not Closing the Brewing Chamber Fully: If the brewing chamber is not closed all the way, the Keurig Mini will not start the brewing process.
- Overfilling the Water Reservoir: Overfilling the water reservoir can lead to water spilling during brewing or cause the machine to malfunction.
- Using Damaged or Incorrect K-Cups: Using damaged or non-compatible K-Cups can result in leaks or clogs and may affect the taste of your coffee.
- Not Descaling Regularly: Neglecting to descale the Keurig Mini regularly can result in mineral buildup, affecting the machine’s performance and the taste of your beverages.
- Not Checking for Leaks: Not checking for leaks or spills around the machine can lead to water damage and affect the machine’s functionality.
- Forgetting to Turn Off the Machine: Leaving the Keurig Mini on when not in use can waste energy. Remember to turn it off or look for a model with an auto-off feature.
To avoid these mistakes, always refer to the user manual for your specific Keurig Mini model and follow the recommended guidelines for proper use, cleaning, and maintenance. Regularly cleaning and descaling your Keurig Mini can go a long way in preventing many of these common issues and ensuring smooth operation.
There are How to Use Keurig Mini as above.
FAQS ABOUT HOW TO USE KEURIG MINI.

Here are 8 frequently asked questions (FAQs) about how to use Keurig Mini, along with their answers:
1. Question 1: How do I set up my Keurig Mini for the first time?
A: To set up your Keurig Mini, place it on a flat surface near an electrical outlet. Lift the water reservoir lid, wash the reservoir, and fill it with fresh, cold water. Plug in the machine, turn it on (if applicable), and wait a few minutes for it to preheat before brewing your first cup.
2. Question 2: How do I brew coffee with my Keurig Mini?
A: To brew coffee, lift the handle to open the brewing chamber, insert a K-Cup pod, close the handle, and select your desired brew size. Place a cup under the brew spout and press the brew button. The Keurig Mini will start brewing your coffee.
We introduce How to Use Keurig Mini as above.
3. Question 3: Can I adjust the brew strength with my Keurig Mini?
A: Some Keurig Mini models have a “Strong Brew” option that increases the brew strength. If your model has this feature, you can use it to get a bolder cup of coffee.
4. Question 4: How do I clean the brewer needle of my Keurig Mini?
A: To clean the brewer needle, lift the handle to access the brewing chamber, then carefully use a paperclip or a Keurig-approved cleaning tool to remove any coffee grounds or debris that may be clogging the needle.
5. Question 5: How often should I descale my Keurig Mini?
A: Descaling is recommended every 3 to 6 months or as needed, depending on the hardness of your water. Follow the descaling instructions in the user manual or on the descaling solution packaging.
6. Question 6: Can I use reusable K-Cups with my Keurig Mini?
A: Yes, many Keurig Mini models are compatible with reusable K-Cup filters. These allow you to use your own coffee grounds and reduce waste.
You can see How to Use Keurig Mini as above.
7. Question 7: What should I do if my Keurig Mini displays an “Add Water” message even when the reservoir is full?
A: If your Keurig Mini displays an “Add Water” message when the reservoir is full, try removing and re-seating the reservoir to ensure it is correctly connected to the machine.
8. Question 8: Why is my Keurig Mini not brewing or taking a long time to brew?
A: There could be several reasons for this issue. Check if there is enough water in the reservoir, clean the brewer needle, ensure the K-Cup is correctly inserted, and verify that the handle is fully closed before starting the brewing process.
Always refer to the user manual for your specific Keurig Mini model for more detailed instructions and troubleshooting tips.
You can refer How to Use Keurig Mini as above.
CONCLUSION.
In conclusion, the Keurig Mini offers a convenient and user-friendly solution for single-serve coffee and hot beverage brewing. With its compact design and straightforward operation, the Keurig Mini is an excellent choice for those with limited space or on-the-go lifestyles.
By following the proper steps on How to Use Keurig Mini, brewing, and maintenance, users can enjoy a delightful cup of coffee or a variety of hot beverages with ease.
To get the most out of your Keurig Mini, remember to use fresh, cold water, choose the right brew size, and explore the wide range of K-Cup flavors available. Regular cleaning and descaling are essential to keep your machine in optimal condition and ensure the best-tasting beverages.
Whether you prefer a classic cup of coffee, a creamy latte, or an iced beverage, the Keurig Mini provides endless possibilities for customization and convenience. With attention to detail and a touch of creativity, you can turn your Keurig Mini into your personal coffee shop right at home.
Incorporate the tips and recipes provided in this article to elevate your Keurig Mini experience and savor every sip of your favorite coffee creations. Enjoy the journey of discovering new flavors and perfecting your brewing routine with this efficient and reliable single-serve coffee maker. Cheers to delightful mornings and satisfying coffee breaks with your Keurig Mini!
Read more:
Top 8 Best Espresso Machine Under 200 Reviews in 2024